Self-Hosted iSCSI/ZFS Filer on ESXi
Intro
As a follow on to “Creating a Datastore on your ESXi USB Boot Drive”, I’m now going to go through the process of setting up a “self-hosted” filer to support the actual VMs, I’m mainly doing this to save me having to either remember what I did or figure it out again next time ;)
This is for my home lab whereas the “USB Boot Drive” process was developed for another box, in this case I’m fortunate enough to have spare controllers and bays in my home box (that SC836 I picked up on eBay), so I’m running off a 60GB SSD so it’s less of a pain in the arse, but the same process applies in either case.
I’m using Alpine Linux for this because it’s pretty lightweight and so far has treated me well (it was also the only distro I tried in which the drivers for the storage controller in the first box worked 100% every time). That being said this process will work on the distribution of your choice with minor modifications (package names may be different and Alpine uses OpenRC).
The first thing you need to do is to create a new VM on your “boot” datastore, and ideally pass through your storage controller to it (though if you must you can pass individual disks through). Then install Alpine (or your perferred distro) on it, I’m not going to bore you with the details, partly because I use a bootserver to install everything so your process will probably differ, but mostly because I’m lazy…
The ZFS Bit
As noted above, I’m using Alpine here, first up we’ll install our ZFS packages;
alpinefiler# apk add zfsLoad the ZFS module at boot (and load it now);
alpinefiler# echo zfs >> /etc/modules
alpinefiler# modprobe zfs
Enable and start the ZFS-Import and ZFS-Mount services;
alpinefiler# rc-update add zfs-import
 * service zfs-import added to runlevel default
alpinefiler# rc-update add zfs-mount
 * service zfs-mount added to runlevel default
alpinefiler# rc-service zfs-import start
alpinefiler# rc-service zfs-mount start
 * Mounting ZFS filesystem(s) ...
And now configure your zpool as your fancy takes you (in this case I’m using a two-way mirror with four disks essentially RAID10 or is it RAID01 never can remember);
alpinefiler# zpool create VMStore mirror sdb sdc mirror sdd sdeIf all’s well now you should have the VMStore pool mounted at /VMStore and it should get automagically imported and mounted at reboot (feel free to reboot to make sure).
The iSCSI Bit
We’re going to use targetcli here, I don’t particularly LIKE targetcli, it’s very dependency heavy and requires dbus (ewwww) so it’s likely rebuild this box using FreeBSD (unfortunately not an option for the original box because the FreeBSD drivers for the storage controller are even worse than the Linux drivers)…
First thing you’ll need to do is enable the “community” repository, edit /etc/apk/repositories and uncomment the “community” repository line (the first one, usually on the third line, you probably don’t want “edge”).
Once that’s done you can install targetcli (I’m also including some dependencies here which for some reason aren’t picked up by the package);
alpinefiler# apk add targetcli dbus py-gobject3At this point you should probably also install open-vm-tools so your host can gracefully shut down your filer.
Then enable and start the necessary services;
alpinefiler# rc-update add dbus
 * service dbus added to runlevel default
alpinefiler# rc-update add targetcli
 * service targetcli added to runlevel default
alpinefiler# rc-service dbus start
 * Starting dbus ...
alpinefiler# rc-service targetcli start
 * Starting targetcli ...
Warning: Could not load preferences file /root/.targecli/prefs.bin.
Restore file /etc/target/saveconfig.json not found
Don’t worry about the two messages for the moment.
In theory you ought to be able to create your backing file from within targetcli but it’s never worked for me, instead I manually create a sparse file the appropriate size using dd (1800G here). If you’re not dedicating a filesystem to the backing store (and you should) you will be better off creating a solid file as your sparse file will get fragmented (for solid lose the count= parameter and set your block size to something sensible like bs=32k or bs=1M);
alpinefiler# dd if=/dev/zero of=/VMStore/VMBucket bs=1 count=0 seek=1800GNow we’ll go ahead and configure targetcli, first step is to configure your backing store;
targetcli shell version 2.1.fb49
Copyright 2011-2013 by Datera, Inc and others.
For help on commands, type 'help'.
/> cd backstores/fileio
/backstores/fileio> create file_or_dev=/VMStore/VMBucket name=VMBucket
Created fileio VMBucket with size 1932735283200
VMBucket is the symbolic name of this backstore within target cli, it’s largely arbitrary.
Some notes on iSCSI target naming
According to the RFC it’s supposed to be iqn.YYYY-MM.tld.domain[.subdomain]:<unique name> Where tld.domain[.subdomain] is a domain in reverse order and YYYY-MM is the year and month that domain was first registered. For my money this is stupidly arbitrary and I can see no sane reason for it, BUT some stuff actually validates against this ridiculous pattern so you’ll want to make yours at least look like that.
Now let’s go and actually configure it.
/> cd /iscsi
/iscsi> create iqn.2019-09.com.darkglade:VMBucket
Created target iqn.2019-09.com.darkglade:vmbucket.
Created TPG 1.
Global pref auto_add_default_portal=true
Created default portal listening on all IPs (0.0.0.0), port 3260.
If you only want it to listen on specific IP addresses you can traverse down to /iscsi/<your target>/tpg1/portals remove the 0.0.0.0 portal and add one on your preferred IP.
Now to create a lun on your target;
/iscsi> cd iqn.2019-09.com.darkglade:vmbucket/tpg1/luns
/iscsi/iqn.20...ket/tpg1/luns> create /backstores/fileio/VMBucket
Created LUN 0.
And finally you need to configure ACLs, here I’m just allowing full access without authentication, you probably ought to consider how to do this “properly” within your environment;
/iscsi/iqn.20...ket/tpg1/luns> cd ..
/iscsi/iqn.20...vmbucket/tpg1> set attribute demo_mode_write_protect=0
Parameter demo_mode_write_protect is now '0'.
/iscsi/iqn.20...vmbucket/tpg1> set attribute authentication=0
Parameter authentication is now '0'.
/iscsi/iqn.20...vmbucket/tpg1> set attribute generate_node_acls=1
Parameter generate_node_acls is now '1'.
/iscsi/iqn.20...vmbucket/tpg1> cd /
/> saveconfig
Last 10 configs saved in /etc/target/backup/.
Configuration saved to /etc/target/saveconfig.json
/> exit
Global pref auto_save_on_exit=true
Last 10 configs saved in /etc/target/backup/.
Configuration saved to /etc/target/saveconfig.json
For sanity checking purposes here’s the output from ls in my targetcli config;
/> ls
o- / ......................................................................................................................... [...]
  o- backstores .............................................................................................................. [...]
  | o- block .................................................................................................. [Storage Objects: 0]
  | o- fileio ................................................................................................. [Storage Objects: 1]
  | | o- VMBucket ................................................................ [/VMStore/VMBucket (1.8TiB) write-back activated]
  | |   o- alua ................................................................................................... [ALUA Groups: 1]
  | |     o- default_tg_pt_gp ....................................................................... [ALUA state: Active/optimized]
  | o- pscsi .................................................................................................. [Storage Objects: 0]
  | o- ramdisk ................................................................................................ [Storage Objects: 0]
  o- iscsi ............................................................................................................ [Targets: 1]
  | o- iqn.2019-09.com.darkglade:vmbucket ................................................................................ [TPGs: 1]
  |   o- tpg1 .................................................................................................. [gen-acls, no-auth]
  |     o- acls .......................................................................................................... [ACLs: 0]
  |     o- luns .......................................................................................................... [LUNs: 1]
  |     | o- lun0 ......................................................... [fileio/VMBucket (/VMStore/VMBucket) (default_tg_pt_gp)]
  |     o- portals .................................................................................................... [Portals: 1]
  |       o- 0.0.0.0:3260 ..................................................................................................... [OK]
  o- loopback ......................................................................................................... [Targets: 0]
  o- vhost ............................................................................................................ [Targets: 0]
  o- xen-pvscsi ....................................................................................................... [Targets: 0]
You should now have an iSCSI target which will persist after a reboot.
The ESXi Bit
Now to actually configure that iSCSI target on ESXi, sadly this is not as easy as it ought to be. It seems that in at least ESXi 6.7.0u2 (though I feel like I’ve seen the same issue on earlier versions) you can’t fully configure the Software iSCSI adapter through the Web UI (once the adapter is enabled if you select it again in the Web UI you’ll get an unrecoverable exception pop up) so we have to resort to esxcli…
[root@esxi:~] esxcli iscsi software set --enabled=true
Software iSCSI Enabled
[root@esxi:~] esxcli iscsi adapter list
Adapter  Driver     State   UID            Description
-------  ---------  ------  -------------  ----------------------
vmhba64  iscsi_vmk  online  iscsi.vmhba64  iSCSI Software Adapter
[root@esxi:~] esxcli iscsi adapter discovery sendtarget add --address=192.168.0.35:3260 --adapter=vmhba64
[root@esxi:~] esxcli storage core adapter rescan --adapter=vmhba64
Now if all’s well, looking in your WebUI you should see your new iSCSI device under “Storage->Devices”
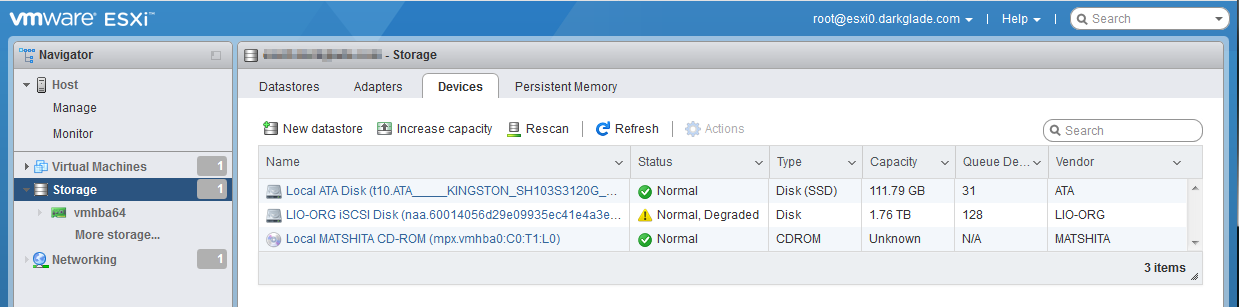
ESXi Storage
The “Status” of “Normal, Degraded” is due to the iSCSI target not being multi-pathed, feel free to make it multi-pathed but since all the networking is internal to the box I don’t really see the point…
Proceed to create your Datastore as you would for any local device and you’re done…
Well almost, in the current state autoboot WON’T WORK (well at least for any box after the filer), this article’s getting a bit long so I’ll discuss that in the next post.
Addendum
At some point along the line it seems some incompatibility/breakage has been introduced into the targetcli codebase (or perhaps just the Alpine version), it manifests as a failure to restore configuration at startup/using restoreconfig from the targetcli shell, if you’re impacted you’ll get this error (and targetcli will whinge at startup):
/> restoreconfig /etc/target/saveconfig.json
Traceback (most recent call last):
  File "/usr/bin/targetcli", line 272, in <module>
    main()
  File "/usr/bin/targetcli", line 260, in main
    shell.run_interactive()
  File "/usr/lib/python3.8/site-packages/configshell_fb/shell.py", line 905, in run_interactive
    self._cli_loop()
  File "/usr/lib/python3.8/site-packages/configshell_fb/shell.py", line 734, in _cli_loop
    self.run_cmdline(cmdline)
  File "/usr/lib/python3.8/site-packages/configshell_fb/shell.py", line 848, in run_cmdline
    self._execute_command(path, command, pparams, kparams)
  File "/usr/lib/python3.8/site-packages/configshell_fb/shell.py", line 823, in _execute_command
    result = target.execute_command(command, pparams, kparams)
  File "/usr/lib/python3.8/site-packages/configshell_fb/node.py", line 1406, in execute_command
    return method(*pparams, **kparams)
  File "/usr/lib/python3.8/site-packages/targetcli/ui_root.py", line 191, in ui_command_restoreconfig
    errors = self.rtsroot.restore_from_file(savefile, clear_existing,
TypeError: restore_from_file() takes from 1 to 4 positional arguments but 5 were given
To fix it you can apply the following patch (Note this is for Python 3.8 the same mods should work with different versions, assuming of course they have the issue):
--- /usr/lib/python3.8/site-packages/targetcli/ui_root.py
+++ ui_root.py
@@ -188,8 +188,8 @@

         target = self.ui_eval_param(target, 'string', None)
         storage_object = self.ui_eval_param(storage_object, 'string', None)
-        errors = self.rtsroot.restore_from_file(savefile, clear_existing,
-                                                target, storage_object)
+        errors = self.rtsroot.restore_from_file(savefile, clear_existing, True)
+                                                #target, storage_object)

         self.refresh()